I have spent a lot of time researching IGH on the Internet to try to figure out which one can take the most abuse. Time and again the hub that people mentioned as the toughest was the Nexus 3. There are people who claim to have run several thousand watts through these hubs for sustained periods without any real problems or failures. The most critical thing that I found is to make sure you’re not running too much power and load on them at the same time as you are shifting. This IGH was very light and with the shifter only added about 2 lbs to my bike. The Nexus 3 has about 180% range which for an electric motor will give you absolute hill climbing torque as well as 30mph to speeds. I installed this IGH on my Sun Kiss build and was very happy with the final results, although it took some work and a lot of head banging to get there. (and I’m not talking about Iron Maiden either)
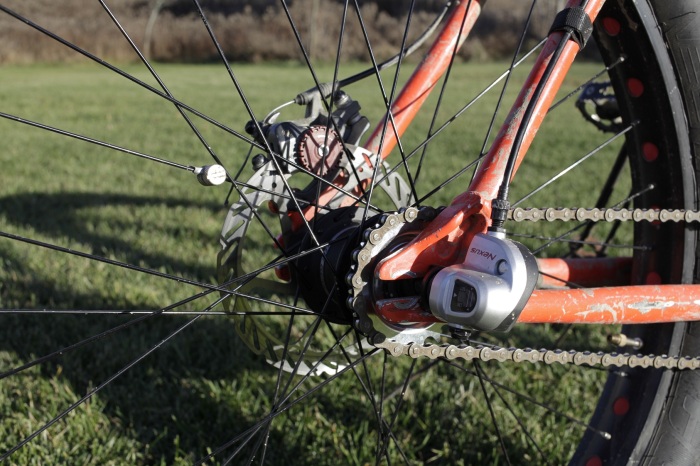
The Nexus 3 is an awesome addition to your single speed fat bike if you have a 130mm dropout. With all that missing orange paint, my Sun Kiss looks like something straight out of Star Wars. I’m with the Rebels.
If you haven’t done a wheel lacing on a fat bike rim, then it is something you should totally struggle through before you die. As my old man used to say “It will grow hair on your chest”, of course, everything was supposed to grow hair on my chest and disappointingly nothing ever did. At 44 I’m still a mostly chest-hair-free giant upright Mongoloid. I spent about 3 hours getting this wheel build right and I was very happy to discover that I could use the spokes that shipped with my Deadeye Monster and if I did a triple cross instead of a double cross (that it shipped with) then they would work. It took me quite a while with a spoke calculator to figure that out, it would probably take you a lot less time because you are so much smarter (and I just told you). There are a lot of spoke calculators on the Internet, but I have yet to find one that I really like. I would give you the links to the sites that helped me figure this out, but I can’t find them and my computer is a pig-sty.
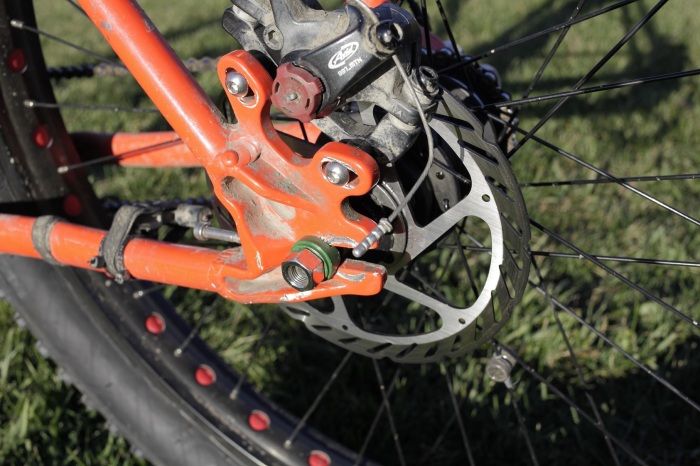
One of my biggest problems was getting the hub to shift over far enough to the drive side. The nut is only half on the axle, although I think I will flip the green alignment nut around to the INSIDE of the dropout which will help.
At around $120 for the whole setup, the price for the Nexus 3 was right. I needed a total of 3 items.
- The Nexus 3 which I bought from Amazon for $82.43 right here.
- Revo shifter for $12.65 located here
- The Centerlock disc brake adapter for $17.95 (highway robbery) located here. I didn’t want to cheap out on the Centerlock adapter and there are several options that are much less expensive, or you can opt for a real center lock brake rotor if you want, which means there is no adapter and the rotor just mounts directly to the Nexus-3. I probably should have done that in retrospect.
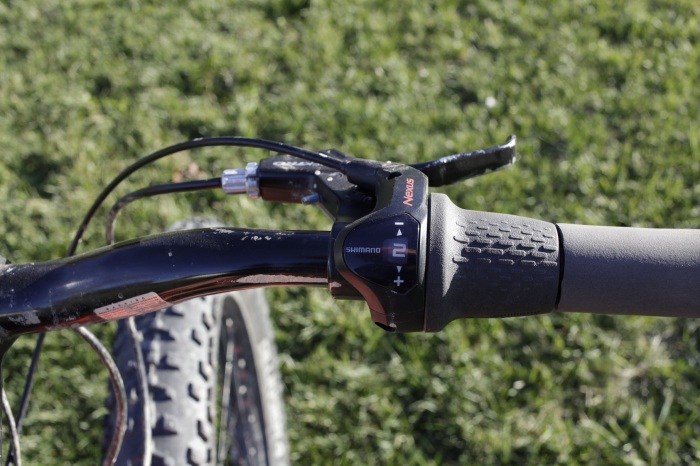
I was really under-enthusiastic about the Revo Grip-sh!t-shifter. Had to cut my Chunky Handgrips in half. Ouch.
The Grip shifter was pretty lame and occasionally would shift on its own without too much input. There was very little resistance to shifting between gears and you have to brace against the shifter when you are pulling on the rear brake which it seems like I am always doing in the woods. If there was another option to go with the Nexus 3 I would use it, but alas there is none.
The wheel build up was a real PITA but the real test was when I tried to get the tire on the bike. I sized the tire down from the old Surly Lou that was on the rear of my trusty Sun Kiss build to a Snow Shoe 4.5. The Lou just barely fit in the chainstays and was barely rubbing on both sides. As the tubeless tire aged it seemed that the rubbing problems worsened to the point where the nubs on the tire were actually starting to wear down. The 4.5 Snow Shoe is much narrower at less than 4 inches on a 50mm rim. It seemed to fit quite well in the dropouts without any rubbing and lots of room to spare. Although the Lou is a much better tire in every way than the Snow Shoe, I went with the tire that I knew was going to be lower maintenance over time on this frame.
The adjustment of the shifter took about all of 2 seconds. Put it in 2nd gear and line up the yellow line in the window. It was the easiest shifter adjustment I’ve ever done hands down.
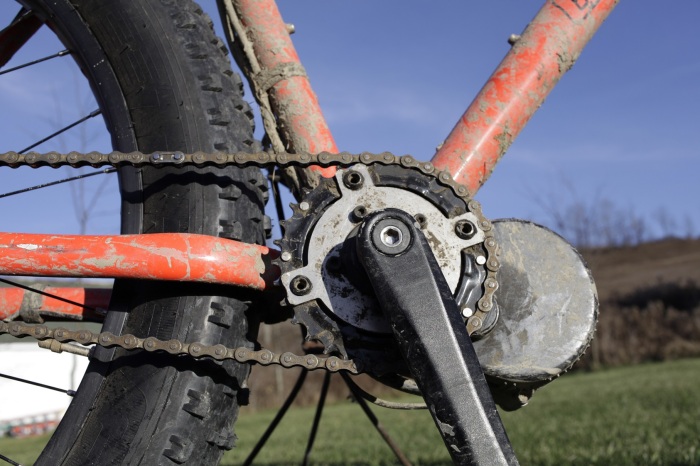
The front 32T chainring was really worn down even though it was solid steel. I had to keep a lot of tension on the chain to keep the chain from popping off with my original build. With the Nexus 3 the chain line improved.
My original Sun Kiss build had a crappy chain line and the rear cog was in about 14mm from the frame. This meant that I had to keep a lot of tension on the chain to keep the chain and also meant that when the frame would flex I would get some chain rub on the massive Lou tire. With the Nexus 3 I was determined to move the rear cog as close as I could to the frame of the bike. When I originally mounted the Nexus 3 the way it was meant to be installed the chain line was WAY off. I had to take off the nut on the drive side which gave me almost 10mm and then I had to use a grinder to make the dropouts on the drive side wider so they could fit the thicker part of the Nexus 3 axle on the drive side. After grinding for a while and having the axle still not fit, I decided to grind off the threads on the top and bottom of the axle so it would slide in. When you do this you have to make sure the alignment nut is installed on the opposite side so the axle is lined up properly before you start taking off the threads. It was a little tricky, but in the end it worked quite well. I added lots of washers on the non-drive side then ended up pinching the dropouts together a few mm to get it to fit. The rear brake alignment was massively messed up and I had to put some huge spacers and much longer bolts to mount the disc brake properly.
The Nexus 3 will not work properly with rear dropouts that are wider than the 135mm standard. There is a 3 speed Sturmey Archer IGH that is designed for 170mm fat bikes that I have and will be testing beating on in the not to distant future (if Eric ever gets around to shipping me another BBSHD) so stay tuned for that.
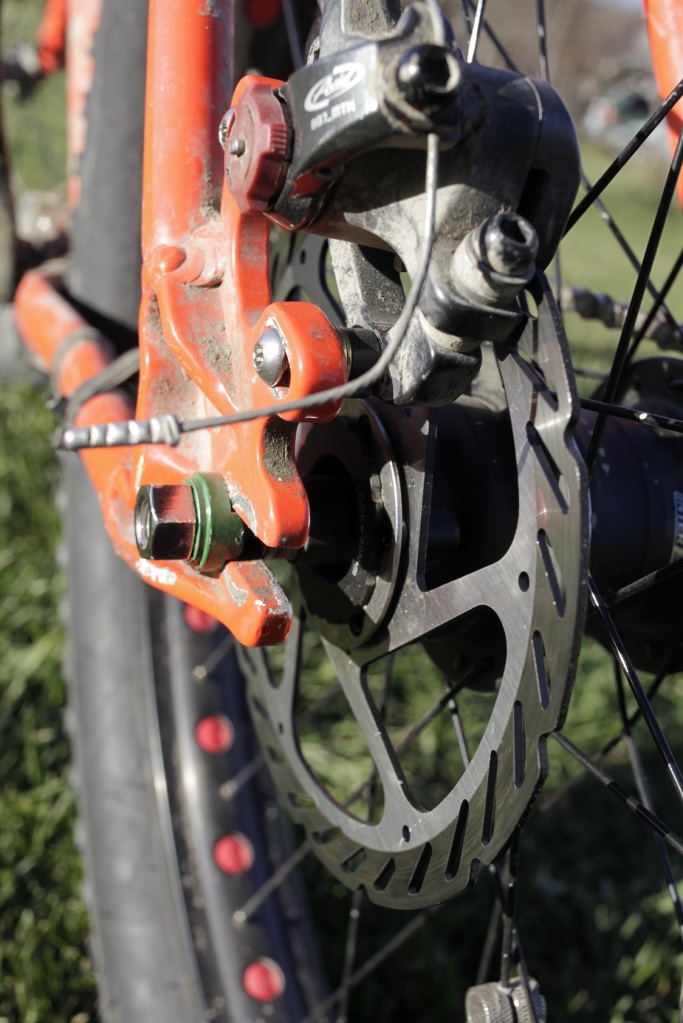
Notice the large spacers on the disc brake that move it towards the drive side, also notice how the nut on the non-drive side is barely on.
I took 4 links out of the chain to go from a 22T in the rear to the 19T that the Nexus 3 came with. Incidentally, there are other sized cogs like a 23T located here that costs $6 if you want more torque or if you want to use a larger chain wheel in the front. I’ve not been that happy with the 32T chainring in the front as it doesn’t fit well with the adapter and the teeth are wearing down very fast, for a steel ring. With a BBSHD I would strongly advise going with the 23T cog and probably the smallest chainring you’re going to be able to put up front is a 38T. The BBSHD produces a lot more power at lower RPM ranges so that combination should be fine.
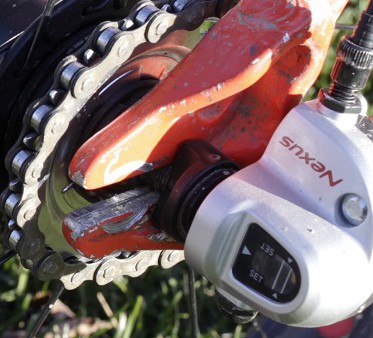
The bolt was too far forward and hit the frame so I had to use one of the adjusters turned at 90 degrees so I could push the wheel adjustment all the way forward.
But how did it ride?
In short, I really liked it. If you were stalled out on a 30-degree slope and tried to take off again in the lowest gear the Nexus 3 would click and grind a lot and wouldn’t really move. If it wasn’t under massive load like that and were riding normally, then the Nexus 3 behaved exactly the way you would think it should. I spent almost all my time in 2nd gear with a comfortable pedaling cadence. When I hit a hill that was over 10 percent grade I would shift into 1 and scoot right up. As long as I didn’t stall out then the unit seemed to work just fine, even on the insanely steep stuff. As soon as I stalled out on steep inclines I quickly learned I had to dismount and push the bike up to the top. This has only happened a few times to me, I learn fast.
On level ground the bike easily hit 25mph with a comfortable pedaling cadence. On the downhill, the bike would go faster than I felt safe going and the pedaling cadence was much too fast to keep up with. With a 32T front ring and a 19T rear I found that was a good match for singletrack trail riding. If you wanted to build a street machine only with a BBSHD you could easily shift it to a 46T front and a 23T rear and have much higher top speeds and still easily climb any paved hill you were likely to find. because electric motors have such a wide range of power over such a large RPM range they make an excellent candidate for a 3-speed IGH. My original single speed Sun Kiss would top out at around 15mph and didn’t have the hill climbing prowess that it had with the Nexus 3 installed.
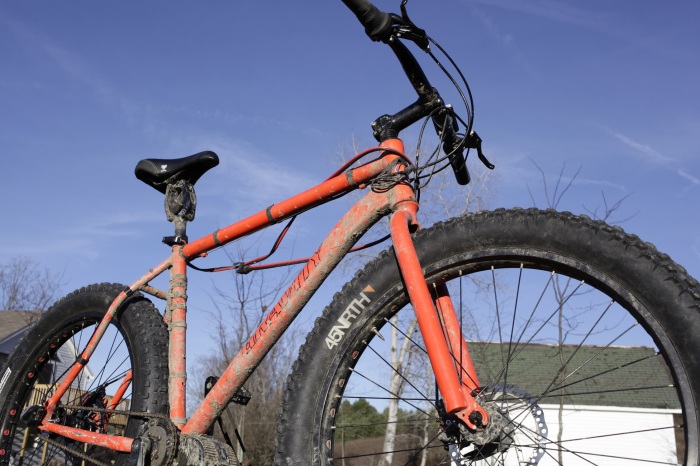
Nexus 3, BBS02 and a Deadeye Monster is a dirt cheap build that blows away most anything else on the market.
I was able to get the cog within about 11mm of the bike frame which was about 3 mm closer than the stock Deadeye Monster without an IGH. When I went riding with it I had zero chain issues even though I ran it much looser than I had with the original build. This build is still one of the best you can get for ~$1000 when you realize you can buy the bike for $399 shipped, get the Nexus 3 IGH for about $120 shipped and the BBS02 for only $535. Add another $265 and throw on a BBSHD instead and you’ll be really cooking with gas. I’ve heard that the newest Deadeye Monsters ship with 80mm rims and a 100mm BB instead of the 50mm rims and the 68mm BB you see here (the website specs are wrong, ignore them). 100mm BB means that the only choice for this build that makes any sense is really the BBSHD as the 100mm BBS02 conversion kits are more expensive and could be more prone to issues. My advice if you want to do ANY conversion is to buy the damn bike first and make SURE you know what you’ve got before you buy a motor and anything else.
The Nexus-3 will only work with dropouts that accept threaded or quick release axles and will NOT work with through hole axles. Be aware that with a single speed IGH you will want either horizontal dropouts or a chain tensioner as otherwise it will be impossible to get the chain tension right. A loose chain at high power makes for all kinds of problems.
Now that I’ve seen how well that a Nexus 3 IGH can work, it’s unlikely that there will be any more single speeds in my future.
I’m also looking forward to a winter without frozen derailleur wheels. (true story)
Ride On.
Update: I’ve spent many hours trying to get the BBSHD to work properly with the Nexus3 IGH on a Deadeye Monster with a 68mm BB and have finally given up. No matter which chainwheel I use and how I try to line up the rear cog I can’t get the chainline to work well enough so that it doesn’t fall off at least once per ride. You might have better luck, but I doubt you will as the 100mm version of the Deadeye Monster is going to have a chainline that is even worse. I cannot recommend the Nexus-3 with the BBSHD on a fatbike frame, although it should be fine on a normal bike frame.
No comments:
Post a Comment